Manage integration objects
You can manage the linking between integration objects and 3D model objects. These links allow Plant/Outfitting objects to utilize data attributes defined in another software program.
You cannot link EDM objects if their 'External Position ID Status' attribute is set to 'Deleted'.
Prerequisites
-
You have checked out any model objects that you wish to link or unlink.
Do the following:
-
Select the Tools tab > External Data group > Manage > Manage integration objects.
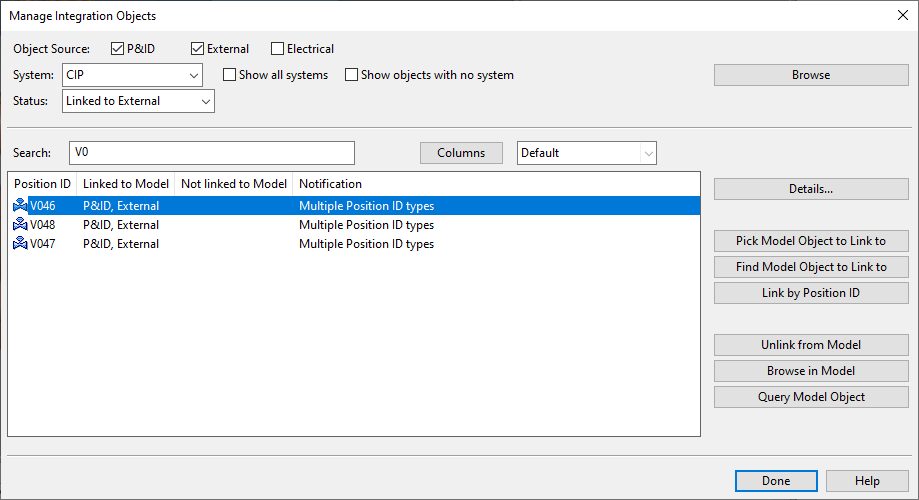
The Manage Integration Objects dialog opens, listing the available integration objects by position ID.
 Show/hide image
Note: This dialog may display integration objects linked to a model object not yet visible in your area, due to the following sequence of events:
1. Another user creates a new model object, links integration objects to it, then saves and checks in the data.
2. You open the Manage Integration Objects dialog. The integration objects are retrieved from COS and appear as linked, but the model object is not visible in your area.
3. Upon executing an area update, the model object becomes visible in your area. -
You can set filters to locate the integration objects you are looking for.
Show/hide details
-
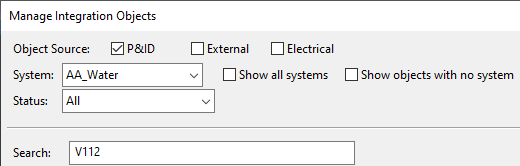
Object Source – You can filter the list based on integration object's type:
-
P&ID – Select this to show 'EPD' objects created by CADMATIC P&ID or third-party applications.
-
External – Select this to show 'EDM' objects imported from XML or created by CADMATIC Web API. See External Data Management (EDM) objects.
-
Electrical – Select this to show 'Electrical Device' objects created by CADMATIC Electrical.
-
-
System – You can filter the list based on object's system:
-
Select a specific system to show only objects assigned to that system.
-
Select Show all systems to show objects assigned to any system.
-
Select Show objects with no system to show also objects not assigned to any system.
-
-
Status – You can filter the list based on object's status:
-
(Not) Linked to Diagram
-
(Not) Linked to External
-
(Not) Linked to Electrical
-
Has Notifications (see table below)
Notification
Meaning
Suggested actions
Broken model object reference
The linked model object no longer exists.
Unlink the model object.
Duplicate integration objects (<type>)
An integration object of the specified type has duplicates with the same position ID.
Check the linking from Details.
Unlink and re-link objects as appropriate.
Delete unwanted duplicates from COS.
Multiple model objects linked
Integration objects have the same position ID but are linked to different model objects.
Check the linking from Details.
Unlink and re-link objects as appropriate.
Multiple Position ID types
Integration objects have the same position ID but are intended for different object types. For example, same ID exists as both Valve Position ID and Equipment Position ID.
Correct the ID assignments.
Partially linked to the model
Integration objects have the same position ID but only some of them are linked to a model object.
Check the linking from Details.
Link objects as appropriate
-
-
Search – You can filter the list by entering a text string. The text string can appear anywhere in the visible columns to be considered a match; click Columns to customize the column layout.
-
-
Select one or more rows from the list, and use the buttons on the right to manage their linking.
Show/hide details
Action
Description
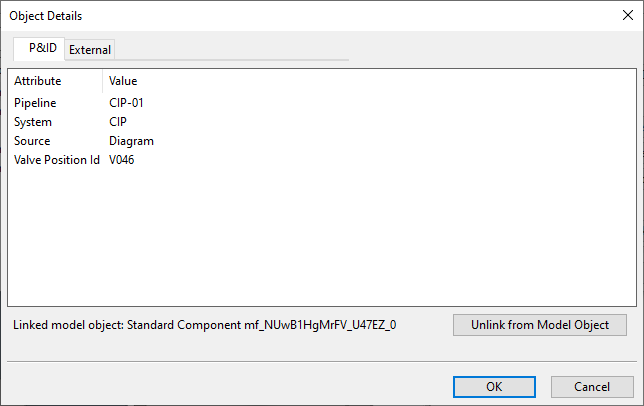
Opens the Object Details dialog.
This dialog displays a tab for each integration object with the given position ID. On each tab, you can see the attributes of the integration object and the possible link to a model object.
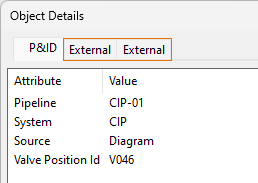
If there are multiple tabs of the same type as shown below, it means that the integration object has duplicates in COS.
If the integration object is linked to the wrong (or non-existing) model object, or the integration object is a duplicate of the intended integration object, you should unlink the object, then correct the linking, and possibly request the project administrator to delete any unwanted duplicates from COS.
-
Unlink from Model Object – Unlinks the integration object from the model object.
Tip: Instead of unlinking integration objects one by one, you can use Unlink from Model or Unlink, but keep position ID to unlink all of them at once.
Allows linking the integration objects to a model object you pick from a work view. Pressing Enter in the work view accepts the linking and returns to this dialog.
Allows linking the integration objects to a model object you select with the Find and Select Objects dialog, using the search functions described in Find.
Links the integration objects to a model object based on the position ID. For example, if EDM object's 'External ID' is 'V001' and model object's 'Valve Position Id' is 'V001', they become linked.
If previously linked objects have been unlinked with Unlink, but keep position ID, this command is able to automatically re-link them.
If an integration object has duplicates, this command selects the newest one, based on creation time in COS.
Unlinks all integration objects, including any duplicates they might have, from the model object.
Note: This command removes the 'Original Position Info' attribute from the model object, preventing automatic re-linking. You will still be able to re-link the integration objects manually, using either Pick Model Object to Link to or Find Model Object to Link to.
To unlink individual integration objects, use Details > Unlink from Model Object instead.
Unlinks all integration objects (including duplicates) from the model object.
Note: This command keeps the 'Original Position Info' attribute in the model object, enabling Link by Position ID to re-link the integration objects.
Opens the active work view and shows a rubber band line between the cursor and the model object. Press Esc to return.
Opens the Object properties dialog, displaying information about the linked model object.
-
-
Click Done to exit the dialog.